
I use scratch on the raspberry pi more than anywhere else. I do this as its very easy to do physical computing with the pi and that make scratch even more fun!
The version of Scratch included with the Raspberry Pi has a number of unique features; one of the most useful is its ability to communicate with the GPIO pins (General Purpose Input Output). These pins allow you to connect your Raspberry Pi to a range of devices, from lights and motors to buttons and sensors. The image below shows you the pins and what they are numbered for coding them to do things.

The first bit of physical computing I ever did was lighting up and LED light. It ws really cool and very simple - before long I was able to light up traffic lights using a red, yellow and green LED. Heres how you can do it too!!!
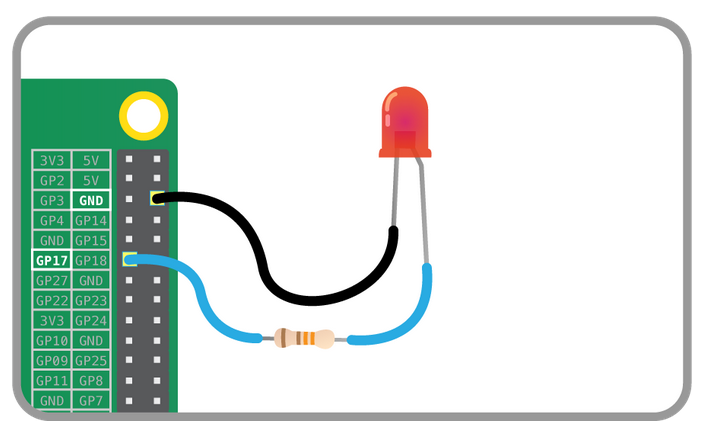
Firstly you need to make a circuit like in the picture below. You need a red LED (or any colour) two Male to female leads and a resistor. We use the ground pin GND and GPIO pin 17. You need to remember which pin you use to code it as a switch in Scratch.
Next, you need to open Scratch on the Pi and connect Scratch to the GPIO pins. For this we use the control switch When the green flag is pressed - then to turn on the GPIO pins in Scratch add broadcast with gpioserveron as the message.

Once scratch knows you are going to use the GPIO pins, you can start using it as a switch. Here is where its important to remember which GPIO pin we used (in this case its 17. Also now the GPIO pins can be used to input and output so we need to tell it which we are doing. We are sending the message out to the GPIO pin number 17 get it to be the switch (like the switch on the wall in your room) so we type config17out into the next broadcast message.

Now for turning the light on and off. This part is again put into a broadcast as its a command we are sending out to tell something when to happen. To turn on the light we tell pin number 17 to turn on. See the block below. (Think of turning on the switch on the wall, you flick it down well this is how you flick it down without having anything to touch)

To turn the light off again its the opposite of tunring it on - its gpio17off

A very important thing to note here if you are snapping the on and off code blocks together is that you will see nothing happen , no light will go on or off - this is because computers work messages so quickly you cant even see it happen - cool eh! SO how do we overcome this, well we use the wait 1 second block and code it to wait as long as we want! The code in the image below is to have the light flash on and off.

Now can you try the traffic lights, add two more leds to a breadboard or to your circuit and have them come on and off in order!!!
Other cool bits you can use Scratch GPIO Pins and Scratch for are:
The PiStop

The PiStop is a little traffic light that you attach to the GPIO pins directly and you can code them the same way you would the LED's using the right pins - heres the pins you can hook it up to - you can have 4 working at the same time like a real traffic light junction - my brothers have done this with their lego and its really cool!!!

The ExplorerHat Pro

The explorer Hat pro by Pimoroni is a really cool device. I have used it to make my own makey makey style control for scratch projects AND it can spin motors, for simple robotics, light LED's you name it!
To use this board you need to set your add on in scratch to ExplorerHat
Then you can use the LEDs, or the push buttons (in the diagram these are 1,2,3 and 4 or the conductor buttons numbers 5 -8 in the diagram!
You can find out more about the raspberry pi on my website www.dontpasstheraspberryjam.weebly.com

